
Product documentation
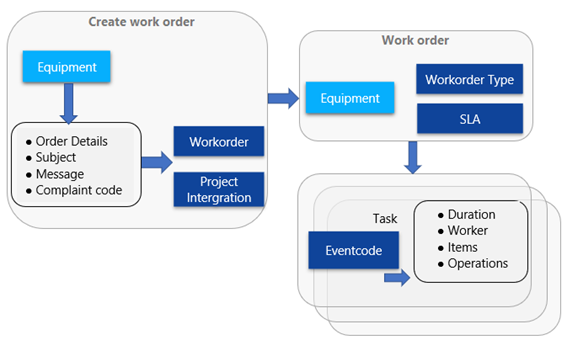
A maintenance activity normally starts with creating a Work Order. Using the repair or helpdesk search screens to find the correct equipment and all other necessary information to create a work order. From the Work Order, one or more Maintenance Task(s) are created to forecast, plan and register actual work that needs to be done on the equipment. The Work Order is used to track and follow up on maintenance activities using service level and SLA milestone registration.
In this topic the steps for the for creating a work order will be descriped. For detailed parameter information see workorders.
A "Work Order Type" is the entity that is used to define what type of service is needed. Each Work Order needs a Work Order Type at the work order creation step. Typical examples could be ‘maintenance’, ‘breakdown’, ‘complaint’ or ‘revision’ requests. Work Order Types have settings that define under which circumstances this Work Order Type is allowed. Also, a Work Order Type is designed so that the user can define the steps, or "work order statuses", that are needed to solve this Work Order from beginning to end. Each work order that gets this Work Order Type assigned will adopt these statuses and settings.
To setup a Work Order Type, go to Maintenance Management - HSO NN > Setup > Work Orders > Work Order Types. The Work Order Types setup screen is now opened.
To start setting up a Work Order Type, click on New. Enter a name in the Work Order Type field, followed by a description. Work Order Types will be listed according to these fields on the left side of the screen.
The Work Order Type setup form has three sections, the first of which is Details. This tab has four headers. Under Options several tick boxes relating to the conditions under which the Work Order Type is allowed: registration behavior and traveling transaction allowance. Under Scheduling, scheduling terms are optional. Setup has mandatory fields ‘calendar’, ‘project group’ and ‘color’. If a Work Order Type is always followed by the same type of task, it can be considered to enter a ‘default eventcode’. If a new task is created for this work order, it will per default have this eventcode. Finally, in Severity setup is mandatory to choose whether this Work Order Types has either a default severity of makes use of the severity matrix.
The second section of this form consists of status lines. These lines represent the statuses that the Work Order Type consists of and are fully customizable. (For each Work Order Type new status lines should be designed.) Lines needs to be created that represent the company’s business logic and workflows from work order statuses "created" to "closed". Typically, between 5 and 12 statuses are created for each Work Order Type, which are held in the correct order sequence by their line number. Optionally, status lines can be created to represent ‘cancelled’, ‘suspended’, or alternative statuses.
Below is an example of a simple business workflow that can be represented in a Work Order type. Green boxes represent the normal ‘happy’ workflow, yellow boxes represent alternative situational statuses and blue boxes represent statuses at which the work order should be able to close. Arrows represent the business-logical order through which a work order with this type will be completed. For the Work Order Type in this example, 10 status lines should be created:
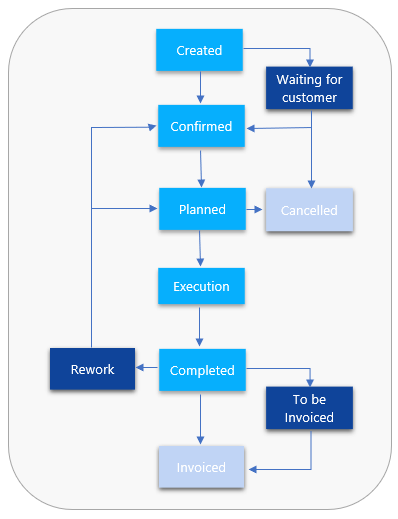
For a Work Order Type, it is possible to define as many statuses as required. However, there is no restriction for the movement between the statuses. In the example above, in the status ‘planned,’ movement is not restricted to only ‘Execution’. This business logic can best be reflected in the Line Numbers or workflow or security settings. Line numbers determine the order of the work order status drop-downs, and it is therefore recommended to link statuses and their line numbers in the correct order.
After creating the status lines, the deadline and action time settings can be filled. This is not considered mandatory but is required in order to create default Work Order Type SLA’s and enables work order progress monitoring in the Work Order List Page.
Deadline days and Deadline Time settings allow to create a deadline for the status calculated from work order creation. For example, ‘Confirmed’: 8 hours. This means that Work Orders (with this Work Order Type) that are in the status ‘Confirmed’ with more than 8 hours after creation are considered overdue. Deadline date/time are designed to signal users that a Work Order is either overdue or on time.
Action Time is designed to warn users that Work Orders are nearing their deadline and to signal users that action on these Work Orders needs to be taken soon (to prevent these Work Orders from going overdue). Action delta type refers to the calculation point from which this Action Time point is calculated. (Options are ‘backward from deadline’, ‘forward from status change’ and ‘backward from SLA reference’). Action delta days and Action time delta are allowed for those date/time settings
The third section of the Work Order Type setup screen depicts the Line Details. These are status line specific settings, consisting of three headers. Allow Status refers to whether the statistic codes Complaint, Cause and Solution Code and Use Quantity Counter need to be filled when changing into this status. This supports business logic and availability of information. The Action time offset calculation section reflects the action time settings on the line. Notify sends notification mails to the Sub status role. Finally, close work order settings are mandatory for statuses at which Work Orders are supposed to close (for invoicing):
Close Work order settings allow the selection of statuses in which it should be possible to close the Work Orders with this type. For each line, setting is defaulted to ‘No close allowed’, which blocks the closing of Work Orders in the selected status. Two other options are available. ‘Close Allowed’ will allow for manual closing of this work order in this status. ‘Automatic Close’ will automatically close the work order when it reaches this status. (In the example mentioned before, closing should be allowed at least for each blue boxed status but can also be set for other statuses.)
When Closing is allowed, settings appear to design the close work order workflow. The following are particularly important: Reopen work order status allows for identifying a work order status in which a work order can be re-opened. This is mandatory for each status in which a work order can be closed. (For example, a work order status ‘closed’ could be re-opened to ‘rework’).
Close Work order Status is mandatory for each status in which a work order can be closed, and is needed to identify the status in which a closed work order will remain in. This could be the same status or another one. (For example, a work order in the status ‘Waiting for Customer’ can be set to change status to ‘Cancelled’ when manually closed.). The setup described above should be repeated for each different Work Order Type.
It is possible to update the status automatically, e.g. an engineer registered his working hours in the task, the status update in the workorder must then automatically be set to status "registered".
Go to: Maintenance Management - HSO NN > Setup > Workorders > Automatic workorder status update
Automatic workorder status update is defining the (new) workorder status when a task status is changed. This enables the option to automatically update the call status. Also, a priority can be set when multiple tasks exists for the same workorder; the priority defines when the workorder status needs to be updated.
Different Work Order Type SLA’s are optional for each Work Order Type. The setup is not mandatory. This setup allows for changing calendar, deadline- and action times for the same Work Order Type, depending of the selected Equipment, Contract, and Severity. This allows the company to assign higher priority and enforce quicker reaction times to Work Orders for certain specific Equipment or Equipment Types, specific Contracts or Contract Types, or Work Orders with a higher degree of Severity. Combinations of those settings are possible to allow for very detailed Service Level Agreements.
For this setup, go to Maintenance Management - HSO NN > Setup > Work Orders > Service Level Agreements to setup priorities, which will be reflected on the work order.
Then go to Maintenance Management - HSO NN > Setup > Work Orders > Work Order Types > Work Order Type SLA’s to make action- and deadline time adjustments.
In order to make use of statistics codes functionality, Complaint, Cause and Solution Code setup needs to be completed. These codes are used to establish a complaint, cause and solution for a Work Order. Each Work Order allows for a complaint code, one cause code, and one solution code. These codes are typically used for problem analysis, reporting and inquiry purposes.
Using complaint, cause and solution codes is optional per default, and is not required to start using Maintenance Management Work Order functionality. With the setup these codes can be set as mandatory to allow status changes. If so, setting up these statistics codes becomes mandatory. To set up mandatory, go to the lines in the workorder type.
To setup these tables go to:
Maintenance Management - HSO NN > Setup > Work Orders > Complaint Code
Maintenance Management - HSO NN > Setup > Work Orders > Cause Code
Maintenance Management - HSO NN > Setup > Work Orders > Solution Code
For each of these codes, the setup table is the same. It simply requires the creation of a list of possible Complaints, Cause, and Solution Codes that the service company can encounter.
The drop-down menus for complaint, cause and solution code are present on four different entities. These drop-downs always match directly to the setup tables as shown below:
On the Create Work order screen.
On the Work Order form -> sub-tab ‘Set-up´
On task header view -> Setup tab.
When a status change takes place on a Work Order, it is checked whether the mandatory statistics codes have been entered. If not, a warning Infolog is given. The status change will not be allowed until all mandatory statistics codes have been entered.
is offering 2 different types of `create Work Order` screens; helpdesk and repair order. To change the type of screens, go to: User settings > User options > Maintenance Management - HSO NN > Creation form type and choose the type you want. In this user manual we show the use of the helpdesk screen. You can deselect the box Use creation form for Work Orders to disable the creation form all together.
Go to Maintenance Management - HSO NN > Work Orders > All Work Orders and click on new in the header. Depending on the set up, the Created Work order screen or a new workorder is opened. To set up which screen must be opened, go to: Maintenance Management - HSO NN > Setup > Parameters > Work order.
The first option is to search using the Location code, by opening the dropdown, you can select the location where the equipment is located.
Second Equipment ID, which is the equipment. When a location code is selected, only the equipment from the selected location will be shown, if no location code is selected, then all equipment will be shown. When opening the Equipment id dropdown, you will see 4-tab pages which are basically filters.
When an equipment is selected which is part of an equipment tree, the Tree tab page is opened automatically which allows the user to select the correct equipment; the Equipment that is selected or an Equipment that is on a higher level.
Next step is to enter a Subject. The subject can be used as the main description of the problem. This will be visible in the grid when opening all Work Orders. Then it is possible to enter all specific details for this work order in the message field like a detailed problem description or any other information which is important to execute this Work Order. The Work Order Type, Work order status and Project integration is automatically set using what is defined for the selected equipment or what is set in the parameters.
It is now possible to enter a Counter value, when this is needed for this specific Equipment, and to select how this work order was received (phone, mail, etc.) using the Received by selection.
Depending on Work Order Type settings it can be mandatory to select Complaint-, Cause- and Solution code. Normally a complaint code is mandatory when creating a work order.
A Work Order form can be evoked in several ways:
By creating a Work Order
By double clicking a Work Order from the Work Order list page
By clicking the Work Order details button on a Maintenance Task, which will bring you directly to the form of the related Work Order.
The Work Order form is the descriptive of the Work Order. It is designed to hold the information needed for your organization to complete the service request and monitor the progress of the Work Order. This information can in turn be used to determine which Maintenance Tasks are needed to complete and close the Work Order.
To search a Work Order form, a typical option is to go to Maintenance Management - HSO NN > Work Orders > All Work Orders, or other filtered work order list pages. A Work Order forms opens in a Header View. Several Headers are present on a Work Order form.
General
The General Tab is used to show the most important information about the Work Order. It is where information about the work order creator (or assigned worker), Work Order type and work order status can be viewed and changed. Also, it shows the equipment related to the Work Order, the location where the equipment is located and the primary user, which worker is responsible for this equipment.
Severity
In the severity tab the severity level is shown, when clicking on view, the severity questions pop up. Depending on the set up of the workorder type, it is possible to change the severity.
If Boolean is on No, the defined severity (in this example high) will be displayed on the workorder, it’s not possible to change the severity on the workorder. When Boolean is on Yes, it is possible to change the severity on the workorder by clicking on the view button.
Service Level
The Service Level tab is used to view the progress of the Work Order in relation to its Service Level Agreement. Here created date and time is shown, and the derived action date and deadline date for the current work order status. In this way it can be viewed whether work order processing is on time, running late or overdue. Functionality is in place to adjust the SLA deadline- and action times.
SLA Milestone
If Milestone recording is turned on for this work order’s Work Order Type, this tab shows the progress of this Work Order against its SLA deadlines. It uses time stamp recording upon exiting service statuses to show a status was completed on time (green) or overdue (red).
Information
This tab stored information that was entered upon work order creation in the Subject and Message fields. These fields are editable and are typically used for external information sharing.
Progress
This tab stores the comments made in the General tab as progress notes. Its purpose is to store comments made about the Work Order’s progress. These notes are given a time stamp and are not editable. Progress notes sometimes are reported externally.
Further Identification
This tab stores information on the Equipment of the Work Order. It can also be used to store the Repair costs of the Work Order.
Setup
This tab allows for viewing the statistics codes, parts availability for tasks on this Work Order, how the order is received and if the workorder is open or closed.
Project
This tab shows how this Work Order is linked to the project module through the equipment integration, shows project contract and shows the project integration of the work order.
History
This tab shows the full details of status changes of this Work Order.
When all Maintenance Tasks on a Work Order have been realized and posted, a Work Order can be closed in two ways. Depending on settings the Work Order can be automatically or manually closed. Work Order Type settings define the work order status to close the Work Order and if it can close the work order.
Manual closing
When in a Work Order form, or from the Work Order list page while selecting the correct work order line, go to the ribbon, Manage > Closing > Close work order. This button is disabled if closing a work order is not allowed in the current work order status.
At this point, the system checks whether mandatory statistics codes are present on the work order. If not, an error occurs, and posting is aborted. If so, fill in the required statistics codes on the Work Order form.
Depending on the Work Order Type Close Work order settings, a dialog screen will pop-up. It shows basic work order information and allows entering statistics codes before closing.
Depending on Work Order Type settings, the work order will close in the same status or changes status while closing. The work order form as well as most functionalities are now grayed out.
To re-open the work order, go to the ribbon Manage > Closing > Reopen, which is now available.
Automatic Work order Closing can occur in two different situations:
1. Changing a work order status while in a Work Order form. This occurs when the status in which the work order is being changed is set to automatically close.
2. When realizing the only/last task related to the Work Order to ‘Ready’. This occurs when setup exists for this combination.
In both situations the button Manage > Closing > Close work order is not needed.
At this point, the system checks whether mandatory statistics codes are present on the work order. If not, an error occurs, and posting is aborted. If so, fill in the required statistics codes on the Work Order form and read the intended status update.
Depending on the Work Order Type Close Work order settings, a dialog screen is being shown. It shows basic work order information and allows entering statistics codes before closing.
Depending on Work Order Type settings, the work order will close in the same status or changes status while closing. The work order form as well as most functionalities are now grayed out.
To re-open the work order, go to Manage > Closing > Reopen, which is now available.